I2C EEPROM にファイルを書き込む [Arduino]
準備するものは、恵梨沙フォントのファイルと、Tera Termというソフトです。
恵梨沙フォントのダウンロード : Vector ソフトを探す!:
http://www.vector.co.jp/soft/dl/data/writing/se013782.html
ダウンロード - Tera Term (テラターム) - SourceForge.JP
http://sourceforge.jp/projects/ttssh2/releases/
続いて、Arduino にシリアルから送られてきたデータをEEPROMに書き込むスケッチをUploadします。
EEPROMは書き込む段階で数msecほどかかるようなので、8バイト毎にデータを書き込むようにしました。
(8で割り切れるファイルサイズでないといけません)
4800 baud でデータを送信します。
Arduino playground のスケッチをまるパクりです。
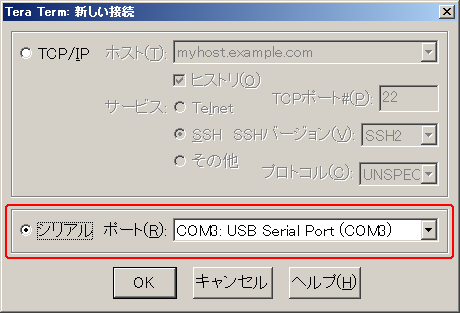
続いて、Tera Term を起動します。
Arduino がつながったシリアルポートを選択。
メニューから、 設定(S) → シリアルポート(E)... を開きます。
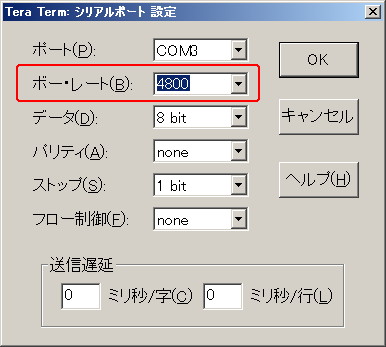
ここで、ボーレートを4800 にします。(スケッチで9600 baudとした場合、ボーレートは9600で送信遅延を 1ミリ秒/字 にすればOKでした。)
またメニューから、ファイル(F) → ファイル送信(S)... を開いて
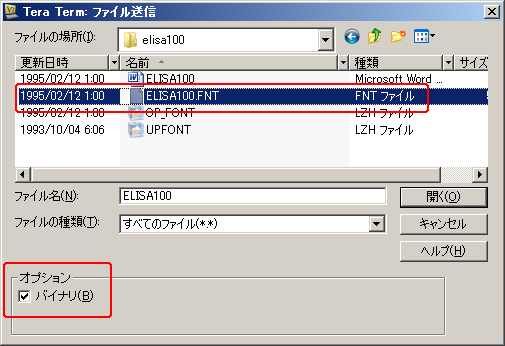
忘れずに、バイナリ(B) にチェックをいれて、ELISA100.FNT を選択し、開く(O) で送信が完了します。
ちゃんと書き込めているかどうかのチェックをするスケッチです。
これも、Arduino playground のスケッチをほぼまるパクりです。
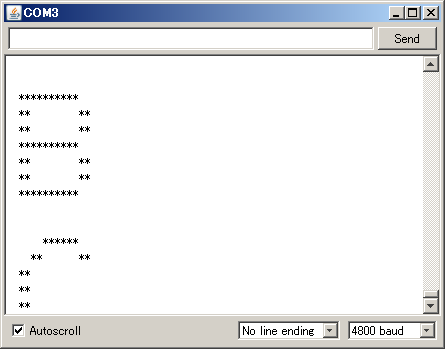
シリアルモニターで、JISコード順に文字がでてきたら成功です。
JISコードは扱いにくいので、シフトJISにしたり、半角用のフォントがないので半角を全角にしたりと、日本語独自の問題があります。次回はこのあたりを解決したいと思います。
恵梨沙フォントのダウンロード : Vector ソフトを探す!:
http://www.vector.co.jp/soft/dl/data/writing/se013782.html
ダウンロード - Tera Term (テラターム) - SourceForge.JP
http://sourceforge.jp/projects/ttssh2/releases/
続いて、Arduino にシリアルから送られてきたデータをEEPROMに書き込むスケッチをUploadします。
EEPROMは書き込む段階で数msecほどかかるようなので、8バイト毎にデータを書き込むようにしました。
(8で割り切れるファイルサイズでないといけません)
4800 baud でデータを送信します。
Arduino playground のスケッチをまるパクりです。
#include <Wire.h> //I2C library

unsigned int addr=0; //first address
byte buf[8];

void setup()
{
  Wire.begin(); // initialise the connection
  Serial.begin(4800);
  delay(10); //add a small delay
}

void loop()
{
  if( Serial.available() >= 8 ){
    for(int i=0; i<8; i++) buf[i] = Serial.read();
    i2c_eeprom_write_page( 0x50, addr, buf, 8 );
    delay(10); //add a small delay
    addr += 8;
  }
}

  // WARNING: address is a page address, 6-bit end will wrap around
  // also, data can be maximum of about 30 bytes, because the Wire library has a buffer of 32 bytes
void i2c_eeprom_write_page( int deviceaddress, unsigned int eeaddresspage, byte* data, byte length ) {
  Wire.beginTransmission(deviceaddress);
  Wire.send((int)(eeaddresspage >> 8)); // MSB
  Wire.send((int)(eeaddresspage & 0xFF)); // LSB
  byte c;
  for ( c = 0; c < length; c++)
    Wire.send(data[c]);
    Wire.endTransmission();
}
続いて、Tera Term を起動します。
Arduino がつながったシリアルポートを選択。
メニューから、 設定(S) → シリアルポート(E)... を開きます。
ここで、ボーレートを4800 にします。(スケッチで9600 baudとした場合、ボーレートは9600で送信遅延を 1ミリ秒/字 にすればOKでした。)
またメニューから、ファイル(F) → ファイル送信(S)... を開いて
忘れずに、バイナリ(B) にチェックをいれて、ELISA100.FNT を選択し、開く(O) で送信が完了します。
ちゃんと書き込めているかどうかのチェックをするスケッチです。
これも、Arduino playground のスケッチをほぼまるパクりです。
#include <Wire.h> //I2C library

unsigned int addr=0; //first address
byte buf[8];

void setup()
{
  Wire.begin(); // initialise the connection
  Serial.begin(4800);
  delay(10); //add a small delay
}

void loop()
{
  i2c_eeprom_read_buffer( 0x50, addr, buf, 8 );
  for(int i=0; i<8; i++) {
    for(int j=7; j>=0; j--) {
      Serial.print( bitRead(buf[i], j) ? "**":"  " );
    }
    Serial.println("");
  }
  Serial.println("");
  addr += 8;
}

  // maybe let's not read more than 30 or 32 bytes at a time!
void i2c_eeprom_read_buffer( int deviceaddress, unsigned int eeaddress, byte *buffer, int length ) {
  Wire.beginTransmission(deviceaddress);
  Wire.send((int)(eeaddress >> 8)); // MSB
  Wire.send((int)(eeaddress & 0xFF)); // LSB
  Wire.endTransmission();
  Wire.requestFrom(deviceaddress,length);
  int c = 0;
  for ( c = 0; c < length; c++ )
    if (Wire.available()) buffer[c] = Wire.receive();
}
シリアルモニターで、JISコード順に文字がでてきたら成功です。
JISコードは扱いにくいので、シフトJISにしたり、半角用のフォントがないので半角を全角にしたりと、日本語独自の問題があります。次回はこのあたりを解決したいと思います。
2011-05-24 20:41
nice!(1)
コメント(0)
トラックバック(1)


コメント 0