0.96インチI2C OLED (SSD1306)用に画像をデータ配列に。 [JavaScript]
Aliexpressで安いI2C OLEDディスプレイとなると、0.96インチの制御チップがSSD1306のもの。
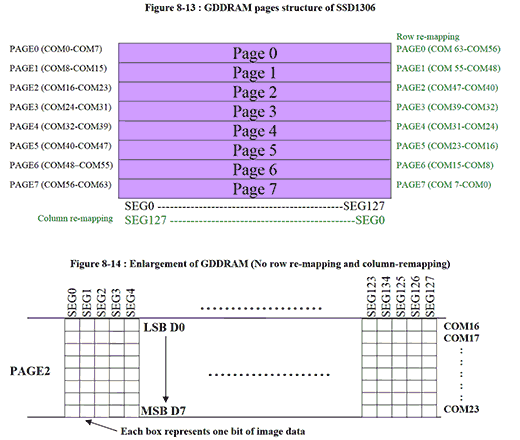
とりあえず画像を出してみたいけど、BMPファイルデータをArduinoで動的に変換する必要はないので、SSD1306に合わせて画像をデータ配列にしたほうがいい。
自作のスクリプトを作った後、すでに画像変換できるサイトがあることが判明。
image2cpp
http://javl.github.io/image2cpp/
ただ、いろいろできる分、設定もたくさんある。
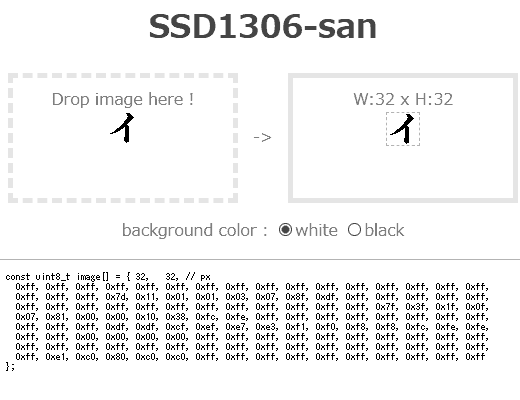
ぼくの作ったのは、サンプルプログラムの寄せ集めだけど、ドラッグ&ドロップでSSD1306専用のデータが瞬時にできるというのが売り。
高さが8の倍数でないときの余白部分を白にするか黒にするかの選択のみ。
HTMLソース
とりあえず画像を出してみたいけど、BMPファイルデータをArduinoで動的に変換する必要はないので、SSD1306に合わせて画像をデータ配列にしたほうがいい。
自作のスクリプトを作った後、すでに画像変換できるサイトがあることが判明。
image2cpp
http://javl.github.io/image2cpp/
ただ、いろいろできる分、設定もたくさんある。
ぼくの作ったのは、サンプルプログラムの寄せ集めだけど、ドラッグ&ドロップでSSD1306専用のデータが瞬時にできるというのが売り。
高さが8の倍数でないときの余白部分を白にするか黒にするかの選択のみ。
HTMLソース
<html>
<head><meta charset="utf-8"><title>SSD1306-san</title></head>
<body style="color:#999; text-align:center;">
<h1 style="color:#666;">SSD1306-san</h1>
<div style="display:flex; justify-content:center; align-items:center;">
<div id="target" style="width:200px; height:100px; border:5px dashed #eee; padding:10px;">
Drop image here !<br>
<img id="preview" style="max-width:200px; max-height:80px;" onLoad="ssd1306img()"><br></div>
<div style="width: 50px; "> -> </div>
<div style="width:200px; height:100px; border:5px solid #eee; padding:10px;">
<span id="info" ></span><br>
<canvas id="cvs" style="max-width:128px; max-height:64px; border:1px dashed #ccc; display:none"></canvas></div></div>
<div>
<p>background color :
<input id="bgw" type="radio" name="bg" checked><label for="bgw">white</label>
<input id="bgb" type="radio" name="bg" ><label for="bgb">black</label>
<p><textarea id="ary" cols=100 rows=20 style="font-size:80%; padding:1em; border:1px solid #ccc;" onClick="this.select()"></textarea></div>
<script>
function $(x) { return document.getElementById(x); }
const ctx = $('cvs').getContext('2d');
$('target').addEventListener('dragover', function (e) {
e.preventDefault();
e.stopPropagation();
e.dataTransfer.dropEffect = 'copy'; } );
$('target').addEventListener('drop', function (e) {
e.stopPropagation();
e.preventDefault();
const reader = new FileReader();
reader.onload = function (e) { preview.src = e.target.result; }
reader.readAsDataURL(e.dataTransfer.files[0]); } );
function ssd1306img() {
const w = $('cvs').width = $('preview').naturalWidth;
const h = $('cvs').height = $('preview').naturalHeight;
const H = h - (h - 1) % 8 + 7;
$('info').innerHTML = "W:" + w + " x H:" + h;
$('cvs').style.display = "none";
$('ary').textContent = " Image size is too large! ";
if( w > 128 || h > 64 ) return;
$('cvs').style.display = "inline";
$('ary').textContent = "const uint8_t image[] = { " + w + ", " + h + ", // px\n ";
ctx.fillStyle = $('bgw').checked ? '#fff' : '#000';
ctx.fillRect(0, 0, w, H);
ctx.drawImage($('preview'), 0, 0);
const img = ctx.getImageData(0, 0, w, h);
let i, d, x, y, b;
for (i = 0; i < img.data.length; i += 4) {
const gray = img.data[i] * 0.299 + img.data[i+1] * 0.587 + img.data[i+2] * 0.114;
img.data[i] = img.data[i+1] = img.data[i+2] = gray > 127 ? 255 : 0;
}
ctx.putImageData(img, 0, 0);
for (i = y = 0; y < H; y += 8) {
for (x = 0; x < w; x++) {
for (b = d = 0; b < 8; b++) d += img.data[(x+(y+b)*w)*4] ? (1<<b) : 0;
$('ary').textContent += (d < 16 ? "0x0" : "0x") + d.toString(16) + ((++i % 16) ? ", ": ",\n ");
}
}
$('ary').textContent = $('ary').textContent.slice( 0, $('ary').textContent.lastIndexOf(',') ) + "\n};";
}
</script>
</body>
</html>
2023-10-21 23:59
nice!(0)
コメント(0)


コメント 0