I2C OLED (SSD1306)に画像を出す。ATtiny202版 [Arduino]
ATtiny202でI2C OLEDに画像を出すスケッチをつくってみた。
GitHub - wagiminator_ATtiny13-TinyOLEDdemo I²C OLED on an ATtiny10_13_202
https://github.com/wagiminator/ATtiny13-TinyOLEDdemo
これを参考に、、といっても、データを流すだけで画像が出るようにデータ配列に変換してあるので大したことはしてません。
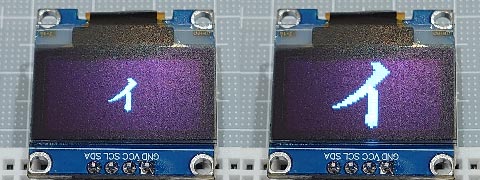
そこで、2倍に拡大した画像も出せるようにしてみました。

ややジャギーが気になるけど、、

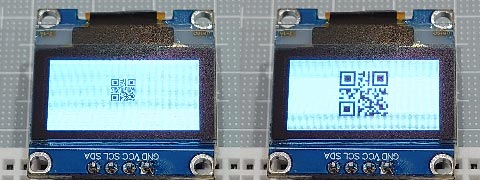
QRコードなら問題なし。
スケッチも1247バイトと軽量。
GitHub - wagiminator_ATtiny13-TinyOLEDdemo I²C OLED on an ATtiny10_13_202
https://github.com/wagiminator/ATtiny13-TinyOLEDdemo
これを参考に、、といっても、データを流すだけで画像が出るようにデータ配列に変換してあるので大したことはしてません。
そこで、2倍に拡大した画像も出せるようにしてみました。

ややジャギーが気になるけど、、

QRコードなら問題なし。
スケッチも1247バイトと軽量。
// tinyOLEDdemo - controlling an I²C OLED (SSD1306) with an ATtiny202
//
// A big thank you to Stefan Wagner
// Project Files (Github):  https://github.com/wagiminator
// License: http://creativecommons.org/licenses/by-sa/3.0/

#include <avr/io.h>
#include <util/delay.h>

const uint8_t img_i[] = {   32,   32, // px
  0x00, 0x00, 0x00, 0x00, 0x00, 0x00, 0x00, 0x00, 0x00, 0x00, 0x00, 0x00, 0x00, 0x00, 0x00, 0x00,
  0x00, 0x00, 0x00, 0x82, 0xee, 0xfe, 0xfe, 0xfc, 0xf8, 0x70, 0x20, 0x00, 0x00, 0x00, 0x00, 0x00,
  0x00, 0x00, 0x00, 0x00, 0x00, 0x00, 0x00, 0x00, 0x00, 0x00, 0x00, 0x00, 0x80, 0xc0, 0xe0, 0xf0,
  0xf8, 0x7e, 0xff, 0xff, 0xef, 0xc7, 0x03, 0x01, 0x00, 0x00, 0x00, 0x00, 0x00, 0x00, 0x00, 0x00,
  0x00, 0x00, 0x00, 0x20, 0x20, 0x30, 0x10, 0x18, 0x1c, 0x0e, 0x0f, 0x07, 0x07, 0x03, 0x01, 0x01,
  0x00, 0x00, 0xff, 0xff, 0xff, 0xff, 0x00, 0x00, 0x00, 0x00, 0x00, 0x00, 0x00, 0x00, 0x00, 0x00,
  0x00, 0x00, 0x00, 0x00, 0x00, 0x00, 0x00, 0x00, 0x00, 0x00, 0x00, 0x00, 0x00, 0x00, 0x00, 0x00,
  0x00, 0x1e, 0x3f, 0x7f, 0x3f, 0x3f, 0x00, 0x00, 0x00, 0x00, 0x00, 0x00, 0x00, 0x00, 0x00, 0x00
};
const uint8_t img_qr[] = {  23,   23, // px
  0xff, 0x01, 0x7d, 0x45, 0x45, 0x45, 0x7d, 0x01, 0xff, 0x2b, 0xcb, 0x71, 0xdf, 0x01, 0xff, 0x01,
  0x7d, 0x45, 0x45, 0x45, 0x7d, 0x01, 0xff, 0xff, 0x59, 0x55, 0x7d, 0x71, 0x49, 0x67, 0x55, 0xf9,
  0x3d, 0xc2, 0x8b, 0x57, 0x91, 0x3d, 0x77, 0xc9, 0x27, 0xb9, 0x93, 0x71, 0xf7, 0xff, 0xff, 0xc0,
  0xdf, 0xd1, 0xd1, 0xd1, 0xdf, 0xc0, 0xff, 0xc1, 0xf3, 0xfa, 0xcd, 0xd5, 0xc8, 0xc5, 0xea, 0xe6,
  0xe8, 0xd8, 0xcb, 0xec, 0xff
};
// ---- I2C Master Implementation (Write only) ---------------------------------

#define I2C_FREQ  800000UL                        // I2C clock frequency in Hz
void I2C_init(void) {                             // I2C init function
  TWI0.MBAUD   = ((F_CPU / I2C_FREQ) - 10) / 2;   //   set TWI master BAUD rate (simplified BAUD calculation)
  TWI0.MCTRLA  = TWI_ENABLE_bm;                   //   enable TWI master
  TWI0.MSTATUS = TWI_BUSSTATE_IDLE_gc;            //   set bus state to idle
}
void I2C_start(uint8_t addr) {                    // I2C start transmission
  TWI0.MADDR = addr;                              //   start sending address
}
void I2C_stop(void) {                             // I2C stop transmission
  while (~TWI0.MSTATUS & TWI_WIF_bm);             //   wait for last transfer to complete
  TWI0.MCTRLB = TWI_MCMD_STOP_gc;                 //   send stop condition
}
void I2C_write(uint8_t data) {                    // I2C transmit one data byte to the slave, ignore ACK bit
  while (~TWI0.MSTATUS & TWI_WIF_bm);             //   wait for last transfer to complete
  TWI0.MDATA = data;                              //   start sending data byte
}

// ---- OLED Implementation ----------------------------------------------------

#define OLED_ADDR       0x78             // OLED write address (Wire lib.:0x3c)
#define OLED_CMD_MODE   0x00             // set command mode
#define OLED_DAT_MODE   0x40             // set data mode

const uint8_t OLED_INIT_CMD[] = {        // OLED init settings
  0xA8, 0x3F,           // set multiplex (HEIGHT-1): 0x1F for 128x32, 0x3F for 128x64
  0x22, 0x00, 0x07,     // set min and max page
  0x20, 0x00,           // set horizontal memory addressing mode
  0xDA, 0x12,           // set COM pins hardware configuration to alternative
  0x8D, 0x14,           // enable charge pump
  0xAF                  // switch on OLED
};

void OLED_init(void) {                    // OLED init function
  I2C_init();                             //   initialize I2C first
  I2C_start(OLED_ADDR);                   //   start transmission to OLED
  I2C_write(OLED_CMD_MODE);               //   set command mode
  for (uint8_t i=0; i<sizeof(OLED_INIT_CMD); i++) I2C_write(OLED_INIT_CMD[i]); //   send the command bytes
  I2C_stop();                             //   stop transmission
}

void OLED_cursor(uint8_t xpos, uint8_t ypos) {// OLED set the cursor
  I2C_start(OLED_ADDR);                   //   start transmission to OLED
  I2C_write(OLED_CMD_MODE);               //   set command mode
  I2C_write(xpos & 0x0F);                 //   set low nibble of start column
  I2C_write(0x10 | (xpos >> 4));          //   set high nibble of start column
  I2C_write(0xB0 | (ypos & 0x07));        //   set start page
  I2C_stop();                             //   stop transmission
}

void OLED_clear(uint8_t p) {              // OLED clear screen with pattern
  OLED_cursor(0, 0);                      //   set cursor at upper left corner
  I2C_start(OLED_ADDR);                   //   start transmission to OLED
  I2C_write(OLED_DAT_MODE);               //   set data mode
  for(uint16_t i=1024; i; i--) I2C_write(p);  // clear the screen
  I2C_stop();                             //   stop transmission
}

void OLED_image(uint8_t xpos, uint8_t ypos, uint8_t *d) {// OLED set image
  const uint8_t w=*d++, h=*d++;
  for(uint8_t y=0; y<(h+7)/8; y++) {
    OLED_cursor(xpos, ypos + y);          //   set the cursor
    I2C_start(OLED_ADDR);                 //   start transmission to OLED
    I2C_write(OLED_DAT_MODE);             //   set data mode
    for(uint8_t x=0; x<w; x++) I2C_write( *d++ );
    I2C_stop();                           //   stop transmission
  }
}

void OLED_image2x(uint8_t xpos, uint8_t ypos, uint8_t *d) {// OLED set 2x image
  const uint8_t x2[]={ 0x0,0x3,0xc,0xf,0x30,0x33,0x3c,0x3f,0xc0,0xc3,0xcc,0xcf,0xf0,0xf3,0xfc,0xff };
  const uint8_t w=*d++, h=*d++;
  for(uint8_t y=0; y<(h+3)/4; y++) {
    OLED_cursor(xpos, ypos + y);          //   set the cursor
    I2C_start(OLED_ADDR);                 //   start transmission to OLED
    I2C_write(OLED_DAT_MODE);             //   set data mode
    for(uint8_t x=0, t; x<w; x++) {
      I2C_write( t = x2[ d[x+(y/2)*w] >> (y%2*4) & 0xf ] );
      I2C_write( t );
    }
    I2C_stop();                           //   stop transmission
  }
}

// ---- Main Function ----------------------------------------------------------

void setup() {
  _delay_ms(100);                         // add delay
  OLED_init();                            // setup I2C OLED
}

void loop() {
  OLED_clear(0x00);                       // clear screen with black
  OLED_image( 48, 2, img_i );
  _delay_ms(1000);
  OLED_image2x( 32, 0, img_i );
  _delay_ms(2000);
  OLED_clear(0xff);                       // clear screen with white
  OLED_image( 52, 2, img_qr );
  _delay_ms(1000);
  OLED_image2x( 41, 1, img_qr );
  _delay_ms(4000);
}
2023-10-22 23:22
nice!(0)
コメント(0)


コメント 0